Updating
Catalog Product Data
Catalog Data may be updated
in three ways ;
- Individually
- Using our Export Process then updating in Excel
- Populate our import file from your back office
systems
Note: IF YOU PROVIDE A FILE IT MUST BE IN THE EXACT
FORMAT AS THE EXPORTED FILE
If you have any problems,
please call the v7 support line at (949) 567-7030 or email us at v7support@birchstreetsystems.com
Using Excel
A good way to update your
catalog product data is to Export it to an Excel Spreadsheet, make
modifications in Excel, and then import the spreadsheet back into the V7
Procurement system. Changes imported
before
The file you import must
maintain the same column structure as the exported file. This file will have the .CSV file
extension. (CSV stands for Comma
Separated Values).
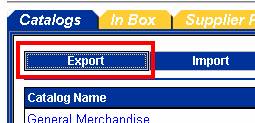
Steps for Updating Catalog Product Data via Export
- Select “Export” from the Catalog tab.
- Several system provided
Filter Selections are available in the drop down. (System provided Filter Selections have
a * next to them such as
“*
rice.”) Each Filter Selection exports a different
combination of product attributes.
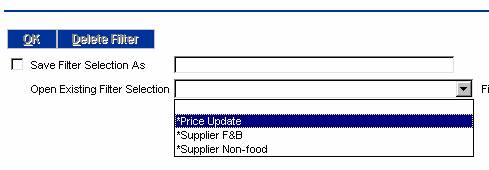
The
“*Price Update” filter exports a limited number of product attributes (17) and
is best for updating prices and basic product information such as: Price,
Product Name, Product #, Price Break Information, etc.
The
F&B Filter Selection exports all attributes associated with Food and
Beverage products (37 attributes). The
Non-Food Filter Selection exports all columns associated with Non-Food products
(33 attributes).
(See
Creating Your Own Filter Selections for information on Filter Selections.)
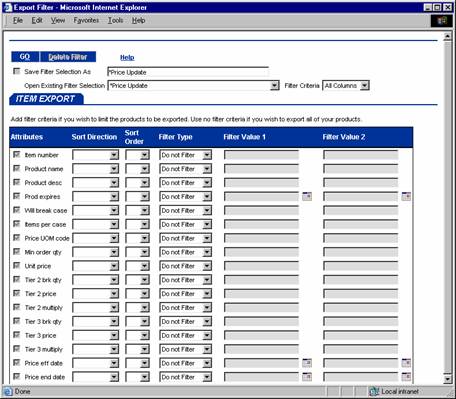
- When you select the Filter the screen will list
the attributes that the chosen filter includes. The attribute names will be listed on
the left side of the page.
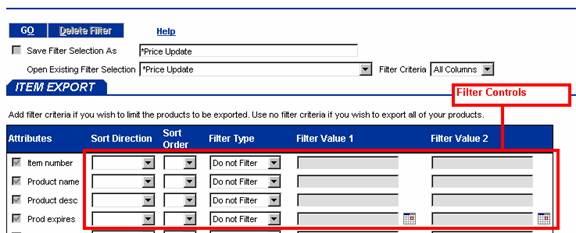
To the right of each
attribute are filter controls allowing you to limit and sort the Product data
that is exported.
(See Filtering
Export Data for more on how to use these controls.)
To export all your products
leave the filter controls blank.
Before you launch
the export please note the Filter Selection you are using. You will need to choose this filter selection
when uploading the file so that the system knows how to process your file.
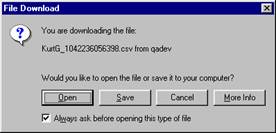
- Click “GO” to launch the export. The file will be downloaded to your
computer and you should receive a message asking if you want to save it to
your computer or open it. Choose
Save and then find a location on your computer to store the file.
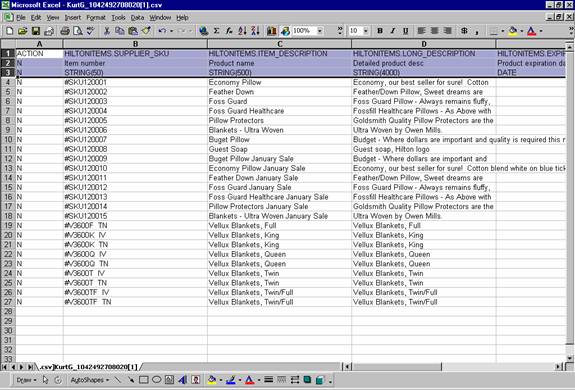
Next, open the file in
Excel. You may want to widen the column
widths to see the data and column headers.
The first three rows contain system information that must be maintained
for the file to be properly uploaded.
- The data can be edited directly in Excel. Following are explanations of selected
columns and how they should be edited:
1. Action: The first column in the spreadsheet is called “Action”. This can be set as follows:
“U” to Update Existing Records
“I” to Insert as a New Record
2. Item Number: Item Number is the 2nd column in the spreadsheet. This is your Item or Product Number. Note that it is prefixed with a “#” sign. This is to allow Item numbers that have leading zeros to be correctly entered and edited in Excel. Without this prefix Excel will removed the leading zeros corrupting your item number. Supplier item numbers with leading zeros imported via Excel must have this ‘#’ symbol prefix. The “#” sign will be stripped off when the file is uploaded so that your number (without the ‘#’ sign) is displayed to the users during the procurement process.
3. Mfg Prod #: Mfg Product # is handeled the same way item number with a leading “#” symbol to account for numbers with leading zeros.
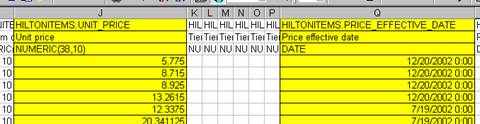
4. Unit
Price: The V7 Procurement System allows you to load new prices for your products
into the system. It also allows you to
determine when a new price will become effective. For example, if you wish to change the price
to $10 and you want that change to be effective on
An error will occur
(and your changes not processed) if you change the unit price and do not change
the price effective date. This will be
caused because you are essentially asking for two different prices to become
effective on the same date (the original and the new price). The unit price and Price effective date
columns are highlighted in yellow below:
5. Before saving the file you should delete any extra rows that you do not want changed. You should only import records that you intend to change. By removing records and blanking cells that you do not intend to change you will reduce the chance of an error or of an unintended data change. Do not remove the first three rows and do not remove any columns.
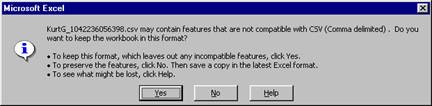
6. After editing, save the file from within Excel. Make sure it is saved in the CSV format. Excel may display a warning stating that the file contains features not compatible with CSV. This is Ok. Click Yes to save the file in the CSV format
- Now that the file is edited and saved, it can be
imported back into the V7 Procurement System. To do this click “Import” from the
Catalog tab.
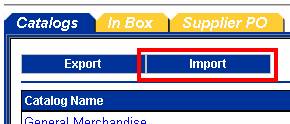
- Then select “Browse” and find the file on your
computer. Select the CSV file you
want to import and select “Open.” A
message will display indicating that the file was uploaded successfully. Click OK. The data changes will be processed that
evening and available in the system the next day.

Filtering Export Data
The export parameter screen
allows you to limit and sort the rows that are exported so that you can work on
just the data you are interested in. By
using the filter controls you can limit the export to only the products that
need to be changed. The fewer products
exported the faster the export will function and the less data you will need to
manage during the editing process.
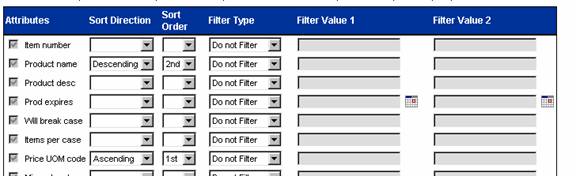
Sorting - Use the “Sort order” and “Sort direction” controls to
sort the exported product data. The
following example will sort first by Unit of Measure and 2nd by
Product Name:
Filtering – Use the Filter Type and Filter Value controls to limit
the exported data to a subset of your products.
These controls work by comparing the data in the database to the values
entered into the Filter Value fields.
There are eight different Filter Types that control the way the
comparison is done. Only records that
meet the comparison test are included in the export file.
The following explains
the eight Filter Types:
= Equals: The value in the database must exactly equal the
value in Filter Value 1 for the product to be included in the export file. The comparison is case sensitive, so for a
record to meet the comparison and be included it must have the same text and
case. The example below will restrict
the export to only the products that are sold by the Case:

!= Not Equal: The value in the database must NOT Equal the value
in Filter Value 1 for the product to be included in the export file.
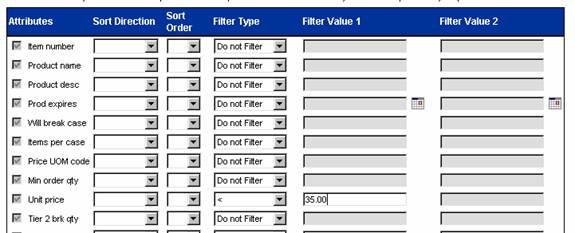
< Less Than: The value in the database must be less than the
value in Filter Value 1 for the product to be included in the export file. The following example will limit the export
to only products that sell for less than 35.00.
When entering dollar values like this omit the “$” sign:
> Greater Than: The value in the database must be greater than the
value in Filter Value 1 for the product to be included in the export file.
=< Equal To or Less
Than: The value in the database must
be equal to, or greater than the value in Filter Value 1 for the product to be
included in the export file.
=> Equal to or Greater
Than: The value in the database must
be equal to, or greater than the value in Filter Value 1 for the product to be
included in the export file.
Like: The value in the database must contain the text or
characters in Filter Value 1. The example
below will export the products that include “large” in the product
description.
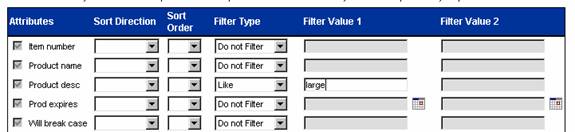
This Filter Type is not case
sensitive. Therefore the following
examples would be included in the export file: “Large Bowl”, “Extra Large”,
“Enlarger”, etc.
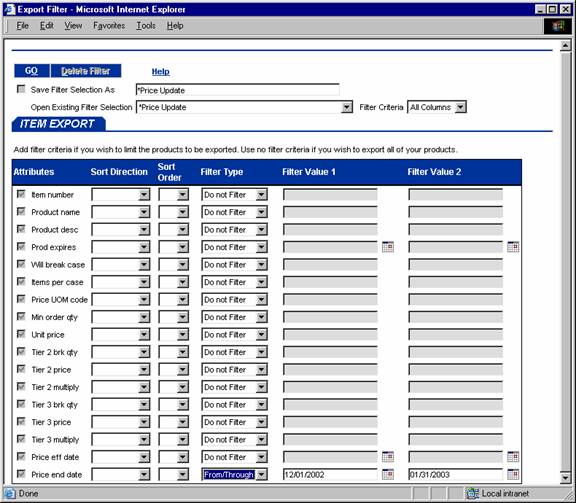
From/Through: The value in the database must be between, or equal
to, the values in Filter Value 1 and Filter Value 2. The following example includes products with
a price end date between
Multiple Filter Values – Use multiple Filter Values in combination to
further limit the products that are exported.
When multiple filter values are used the system will limit the export to
only the products that meet ALL the criteria.
The following example will only export products with end dates between
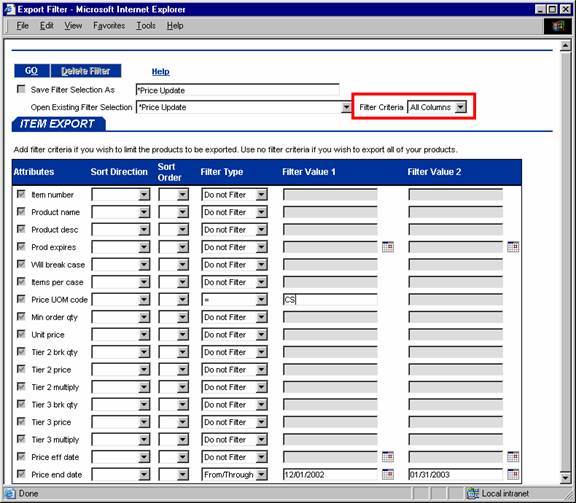
Note in the top right the
Filter Criteria is set to “All Columns”.
This means that only products meeting all the criteria (price end date
and UOM) will be exported. Change this
to “Any Columns” to expand the export to include products that meet any of the
criteria. Under this setting all products
sold by the Case along with all products with end dates between
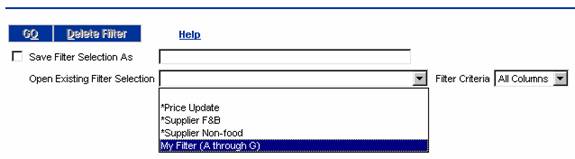
Creating Your Own Filter Selections
If you find that you use the
same filter criteria and filter values repeatedly then you may want to save
your criteria in your own Filter Selection.
First enter your filter selction values and
types. Then type a name for your filter
selection into the “Save Filter Selection As” text box. Make sure the name does not include the *
character as this is reserved for system filters. Then click on the associated check box. Next launch your export by clicking on
GO. When your filter is run it will also
be saved.
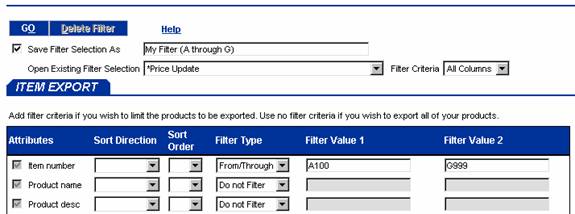
The next time you return to
this screen your Filter Selection will be included in the list of available
Filter Selections.